Thursday, July 29, 2010

Report: Hand Fabricated Chains Class

Just finished up 4 weeks of one of the most fun classes I have ever taught, Hand Fabricated Chains at Phoenix Art Center! I had a great group and they worked hard in what little time they had and finished with some great stuff. The first few images are chains I made as samples for the class, and the rest are a few images of some of the student work (I didn't get pics of everything unfortunately) . Ill be teaching this class again in the fall, but in an 8 week format as opposed to 4 weeks, and it will be at Mesa Art Center...stay tuned for details!samples
More samples. I made a bunch of copper samples too but forgot to take pics of them so I guess I'll post them later.
samples
Sandy Halka
Paula Ellis

Paula Ellis
Kay Cummins

Cole Allen
Nina Jeffre
Nina Jeffre


Nina JeffreNina JeffreNina JeffreNina Jeffre


Wednesday, July 28, 2010

A Few More Custom Orders and a New Camera!

I finished lots more wedding rings this week! The one above I showed on here before, but I finished the wedding band to go with the engagement ring. My friend Marco designed it for his girlfriend Jana, and our other friend Melissa McGurgan did the graphics. Its a little diamond bling with little sparkle rays coming from it. I love the idea!These are another set of wedding bands with copper center spinning bands.

This last one is a custom Mothers ring. The copper center spinning band is etched with the children's names.
Thanks to all these custom orders, I got to buy myself a new camera! More details or the camera coming soon:)

Monday, July 26, 2010

Just to Follow Up...

I just wanted to let you know that POOL announced the winner of their merchant contest today and sadly it was not me. Even though I didn't win I am so grateful to all of you for your votes, your support and well wishes. Thanks for being such great friends! The entire process was a great experience for me, I learned so much. At some point in the future I may want to pursue this idea again, but for now I will keep myself busy as a resident artist at Mesa Art Center teaching classes in metals and jewelry.

Friday, July 23, 2010

Blacksmithing

Last semester I took Blacksmithing at ASU from Tedd McDonah.
(On a side note, its going to be hard for me to adjust to life outside of semesters and summer break...)
Honestly, I thought I would hate blacksmithing. I mean, really, it didn't look like much fun to me...lighting coke forges, getting disgustingly filthy (they call it blacksmithing for a reason!), standing over a 1500+ degree forge in 100 degree weather, pounding on huge steel bar that is red hot with really heavy hammers...didn't much sound like my kind of party. Well, it ended up being one of my favorite classes...ever. I LOVED blacksmithing. I loved lighting the old coke forges, using the hand crank blower, pounding red hot steel, learning to manipulate the metal...it was really fun. Really. I wish I had taken it sooner...there were so many things I wanted to make that I didn't end up having time for (or the biceps for). Anyway, here are some pictures of what I ended up doing in blacksmithing. I also made a ton of samples, some little steel hooks that I have hanging around my studio now, and my own pair of blacksmithing tongs...which was really hard, but I felt so hardcore when I finished!
(Click on any of the images to view larger)The picture above is what I made for the candleholder assignment. Its about 14" round. The welding is BAD, but we didn't cover welding in the class...just blacksmithing. Im going to have to take a welding class one of these days.This is what I made for the fork, knife and spoon project. Yeah...didn't feel like making a knife so I sort of ignored that part of the assignment. I loved making the spoon, but I should have started with thicker bar because I didnt have enough material to get a very big spoon bowl. They are about 9" long each...not super functional.The pieces that took up the rest of my time in blacksmithing were these chains I made for my thesis show. There are 4 different chains, made from steel, sterling silver, and antique chandelier crystals. I included a couple of model shots (on my beautiful friend Julie Mikelson) to give you an idea of the scale.
Hopefully in the future I will get to do more blacksmithing! I'd really like to do in on a slightly smaller scale for jewelry applications.
All for now...thanks for reading!

Thursday, July 22, 2010

Among Friends

Just had to post this treasury (created by wanderingspirit) I'm in on Etsy. Im among so many friends! What a great collection of jewelry utilizing rivets. Also, I have pieces similar to the ones shown here by Experimetal and Wildorchiddesigns and I love them both! (Click the image so view the treasury larger)

Friday, July 16, 2010

Another Sneak Peek at the new line...

Just a couple more images of some designs in the new production line I will be launching this fall...

Thursday, July 15, 2010

For those of you that were asking...

A couple of you asked about what I use for ventilation...
I just use a box fan turned backwards in the window. Not super hi-tech but its the best I can do for now!Also, the first thing my husband said when I posted this is, "You don't have a picture of your fire extinguisher!" (Like, how could I possibly have forgotten?!) Which is what he gave me when we first started talking about having a studio at home. He also said (not completely seriously, just mostly seriously) that I wasn't allowed to show anyone my studio until I got the fire extinguisher hung on the wall. He is very safety conscious:) I should also mention that he was very disappointed when I didn't hang it at eye level. "But its so ugly...." I complained... "its an eyesore". Luckily for me I have someone like him to help me see reason:) We balance each other out:)And, for those of you who were wondering why there was not adequate twilight representation, let me tell you...
I have a calendar (oh la la!!), and a first aid kit (twilight band-aids)!! So there! :)

Wednesday, July 14, 2010

The New (Home) Studio

So, I've been wanting to post pictures of my new home studio for awhile now, but I kept waiting thinking I would organize and clean it up better first. Then I realized that this is me we are talking about and that my studio is probably the cleanest it will ever be right now. So, here you go, pictures of my new studio! I have to say, I love it. I love being able to work at home. I guess it has its advantages and disadvantages. There are less distractions than at school, but there are still lots of things that can take my attention away from work (like this computer for example). Honestly though, I love my little studio at home. I have lots more tools to accumulate over time, I am by no means fully equipped, but I can do a lot with what I do have and it makes me so happy. Sometimes I just go in there and look at it:) I know, I'm a huge dork, but you already knew that too:)
These are the pictures of the renovation process. We turned a bedroom in our townhouse into my studio. The first step was to clean out the monstrosity that the room had become. At one time I used the room to work on my school projects, but during my thesis year the room got out of control and then I just started piling things in it. It was horrible. I'm too embarrassed to show the picture of it up here so I'm putting it at the very bottom of this post. Don't judge me.This is the room after the dump trucks cleaned it out (kidding). Its small, but its perfect for right now!My hubby tearing out the carpet. I was so happy to see it go!
Yay! No more carpet! Oh, but I should mention that this is an upstairs bedroom (hence the plywood floors). And now that its a studio, its a very noisy upstairs bedroom:)My favorite part! Color!Pretty paint!
Starting to lay the Pergo flooring.Laying the last piece (hours, and hours, and HOURS later).
Trying to arrange the furniture in a 9x11 bedroom to make the best use of the space (while being married to an engineer) is not the easiest of tasks, but we lived through it:)
So, the next step was to move all my junk in!
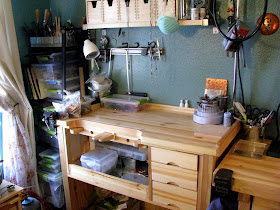
The room is small, 9x11, but I packed a bunch into it. Straight back is a large storage shelf, and then my soldering station in front of the window. On the right is my bench and a tool table with drawers. On the left is another small storage shelf and a larger work table. My hydraulic press fits perfectly between the door and the closet.
Here's my bench!Soldering station.Tool table with anvil, drill press, tumbler and dapping block/punches. On the shelf and wall are little things to inspire me, things from friends or that I've collected along the way.My favorite drawer is full of hammers:)
Hydraulic press (built by Michael Dale Bernard)Storage.And the super embarrassing "before" picture. Hey, I said not to judge!!